I wanted to take pictures of the salon I study at but I thought it would've been weird if I started taking pictures of everything with my huge camera so instead I took few pictures with my cellphone of my gel nails lesson. Now I wanted to take pictures of the step-by-step process but since I had to do the nails myself it was a bit hard so I only took a few pictures of the products we used and the curing process. Sorry guys maybe I'll have a chance to do it again next time! So yesterday was the first time I ever did a UV Gel Overlay on my natural fingernails. The process is quite hard for someone who's never had any experience and I think it definitely takes practice to perfect the treatment. There were so many times where I messed up and overfiled my gels. Anyways on to some of the pictores :)

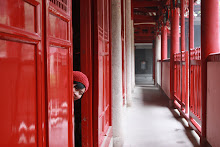
This is my working area. It's super girly and antique-y and lace-y and pink :) There's approximately 8 separate working areas in the whole salon and most of the times they're all filled with other students or clients.

This is our nail polish station. Near the bottom you can see the CND nail polishes neatly arranged by colour on an antique table with a pink flower bucket centerpiece. So pretty :)

This is CND's UV Light (machine?). This is what you use to lock and cure your gel nails. It was quite fun to play with.

Onto the gels. Since my teacher is CND's education embassador it's only natural that we used CND's Brisa gel for the experiment. The whole process was quite simple actually.
1. Use a file to remove the shine. 180 grit file preferred.
2. After the shine has been removed from your natural nails wipe nails with Scrub fresh to prep.
3. After using Scrub Fresh carefully apply a thin layer of gel (similar to a base coat) to your natural nails all the while making sure the gel does not touch your skin (if the gel touches your skin it will most likely cause lifting)

In this picture you can see Scrub Fresh - Gel brush - Gel.

4. After you have applied your 1st gel coat cure in the UV Light for 2 minutes.
5. After you have finished curing wipe nails with Scrub Fresh to remove the sticky layer.
6. After you have removed the sticky layer put on a 2nd coat of the coloured gel.
NOTE* Now I think that this is the tricky part to explain. When you put on the 2nd coat it should be thick and you don't really paint it on. I was taught to pick up the gel with the brush and just push and move the gel around your nail for full coverage. It was definitely hard for me to do so I ended up using my painting method again but basically with more gel so the colour is visible. This just one of the things that takes a lot of practice to get it right.
7. After you finished applying the 2nd coat put your fingers in the UV Light for the locking step. Locking takes only 10 seconds.
NOTE* About a year ago I had gel nails put on and instead of just lightly buffing away the natural shine my nail tech used a drill buffer which is much faster I suppose. At the same time after I had my gel nails removed I noticed that my nails were a bit weaker than before. This was proved yesterday when I put my fingers in for the locking process. The first time you cure the base coat there should be absolutely no feeling at all for your nails. But when it comes to locking I had noticed a sharp intense pain which felt like my nails were burning! It was so hot I had to pull my hands out. When my teacher noticed this she asked me if I had artificial nails before and I told her about my previous gel experience. She concluded that my natural nails aren't as strong as they used to be and had also become thinner than before so that's why the pain was so intense for me. She also noted that it could also be because she had just replaced the UV Light with a new bulb but most likely it was my thin thin nails. She also told me that if I couldn't stand the Locking pain anymore then I can just skip that process and cure for 2 minutes instead.
8. After all that fancy locking and curing remember to remove the sticky layer with Scrub Fresh and prepare to file. Filing was very difficult for me as I couldn't control it properly. I overfiled too much and had to put the gel on again and repeat the whole process. It definitely takes a while to get used to.
9. Once you are satisfied with the shape of the nail seal everything in with Brisa Gloss the gel top coat but remember to also be careful when applying the top coat because if this touches the skin then it can cause lifting too!
10. After applying the topcoat cure again for 2 minutes.
11. After you have finished curing in the UV Light remove the sticky layer with Scrub Fresh and voila you are FINALLY finished :)
12. Remember to apply cuticle oil because it's most likely that your cuticles would've taken a beating with all that filing.


Being the super newb that I am this actually took me a full 6 hours to do hahha! Well with the exception of a 40minute lunch break :p
I hope this was kinda helpful for anyone who's about to do their own gel nails for the first time or anyone who's about to get gel nails. It will take you some time to get used to the feeling so give it a few days. As for any advice to anyone who's about to do their own nails for the first time I strongly recommend that you have someone there who can guide you because it's really not easy to do but if you're super awesome and can follow instructions perfectly and do everything without fail then by all means good luck with your project :D
PS. The colour of my gels was a clear Cool Pink.
xx
Joyce


That's a pretty nail salon. Do the gel nails give you more strength to grow the nails longer? That class sounds really cool!
ReplyDeleteHii Kaybee :)
ReplyDeleteEverytime I walk into that nail salon I feel like I'm in a fairy tale world lol. The gel nails actually don't guarantee that your nails will grow longer faster or stronger but the good thing about the gel nails is that it looks very natural and also are very flexible more so than acrylics. To me they feel a bit more natural. Acrylic nails on the other hand are stronger and more durable so there's pros and cons in each type on enhancement. Have you ever had fake nails before? My class is actually very fun and addictive! Do you have any classes like that in your area?
That seems like a lovely place :-) Your nails turned out great - they look natural and pretty and this color is very delicate ! It's nice to hear that you're having fun there and it's interesting to read about these things :-)
ReplyDeleteHi Tuli!
ReplyDeleteThanks for your nice comment :) Yeah I think this colour actually suited my skintone quite well. The nail salon is super pink and girly. It's a really fun place to study and play around with nail stuff xx
I've never read about the process of gel nails. Very interesting. Your nails turned out really pretty. Can you make the nails longer?
ReplyDeleteHi Lucy :)
ReplyDeleteThanks for your nice comment! You can definitely make the nails longer. All you have to do is add tips but I chose not to because I knew they were only for practicing purposes and not asthetic reasons. And I've always wanted to try a simple overlay over the natural nails. Have you had gel nails before?
When you say that the nails have to be filed after curing - is that filing/shaping the nail tips or buffing the nail? I have just had acrylic overlays applied and my nail shape (deep c curve I think) made the buffing a very uncomfortable experience. I have had gel overlays before this but the 1st time they lifted and the 2nd time they cracked at the tips - it was not CND gel. Also: with the Brisa gel - can you apply polish over a clear overlay?
ReplyDeleteHi Avroys :)
ReplyDeleteOh when I say the nails have to be filed it's not referring to the tips but the actual nail itself.. it basically means that when you originally apply the gel some areas might be thicker than others so you need to file/buff the entire nail to make it a nice even shape. Filing should not be too uncomfortable. If it was then your nail tech probably did it wrong. Did they file it manually with regular files or use an electric filing tool? My teacher says that it's always best to file the nails with a regular file because the electric filing tool can sometimes overfile and make your nails thin. And yes you can apply polishes over a clear overlay :)
Hi Joyce
ReplyDeleteThank you for your quick response to my question. My nails were filed manually but I ended up with broken skin around 8 of my 10 nails and some of them are quite sore. Apparently I have difficult nails...The area above the nail bed is deep and curved and it is difficult to do the buffing there without hitting the surrounding skin. I might just switch back to gel.
Love your blog! So glad I discovered it.
Hi Avroys!
ReplyDeleteI know how you feel! I hate it when you have to file off the shine for artificial nails and they accidentally file too close to your cuticle area :( Do you always get your nails done at this salon? Have you tried any other salons? Because since the tech is having trouble with your nails maybe he/she isn't super experienced. My teacher told me that no matter what type or condition your nails are in a good nail tech will always be able to do a good job and you shouldn't feel any pain. Although I must say I am very jealous. I hear that a nice C curve is good because it makes the nails stronger :)
Very Informative Post!
ReplyDeleteI bookmarked this page for my future reference. Thanks for sharing the information..
Hi Gel-Nails!
ReplyDeleteThank you for your nice comment! I hope it helps but I'm not fully credible because I'm also learning the process slowly :)
Nice post - gel nails pictures ..Keep Posting
ReplyDeleteRon
gel nails pictures
Hi Joyce
ReplyDeleteI have that same feeling burning sensation sometimes as well. Was trying to understanding your steps, if locking for 10 seconds hurts.. won't 2 minutes hurt even more?
Hey Angie!
ReplyDeleteYou know what I was thinking the same thing too but I finally realized that after the burning sensation when you put your hand back in it just cools off and I think we get used to it. Another thing it might be is that after locking, the gel might've already hardened so that's why the 2 minute cure doens't hurt as much. I'm still trying to figure that out so hopefully when I find answers I'll be able to update you :)
Thank for the speedy reply Joyce!
ReplyDeleteDo you still use CND Brisa Gel? It's hard gel right? I am amazed how you switch from gel to polish like in hours??!
Have you tried soft gel?
:):)
Hey Angie :)
ReplyDeleteYeah CND makes the hard gels. I haven't been using CND Brisa since this class because I wanted to test out some of the other gels out there. I think if I were to stick to one type it would be the soak off gels. I'm a big fan of nail art and sometimes if it's on there too long I just get bored of it lol. Soak off gels are very easy to remove. Some of the good ones are Calgel, BioSculputre, and Christrio. But now a lot of companies like EZ Flow, OPI, and NSI have their own soak off gels. I don't believe that CND does yet but I hope they come out with something soon! xx
Your response is like lightning speed! :)
ReplyDeleteI am thinking of trying soft gel but there are so many out there, I don't know which one to try.
Any favourites?
Also, never tried any of it before so not sure how to apply/remove. What should I get to start?
Angie!
ReplyDeleteHhahahah it's only because I'm online now :D
For starters have you had nail extentions before? Are your nails weak? If you have LOVELY nails then I wouldn't suggest anything like hard gel or acrylics because those can really rough up your nails. But if you have weak nails then I would suggest acrylics for their strength and gel for the fact that it's not as smelly and also it's very shiney haha.
What you need to get started: Did you want to make your nails appear longer? If you do then you would either need to buy nail tips or sculpt them yourself with gel. Nail tips need nail glue so you would need that too. If I were you I would just try out a simple overlay on your natural nails which is basically adding gel onto your nails with no nail extentions and I would also advise the soak off gels because they're easier to remove in my opinion. If you really want to try it for yourself then you should get a starters kit. The starter kits should come with everything you need to make the basic overlay and french nails. A lot of companies who produce soak off gels have their own gel removers. For example Calgel has something called Calaway which removes the gel from your nails leaving minimal damage on your natural nails. All you do is apply the liquid to your nails with a cotton ball, wrap your finger in tin foil and wait for about 15-20 minutes. I think it would be great for you to do some research on soak off gels and then decide which company you want to go with. If it were up to me I think I would try BioSculpture or Calgel. They seem to have good reputations.
I've been really into gel nails this year too. Let me know which one you might be interested in trying! We can research together :)
It's so nice to receive your reply again so soon! :)
ReplyDeleteI have been doing hard gels on myself for a few months. I guess my nails dont look lovely anymore cos' I am guilty of overfiling most of them...
I only tried to use acrylic to design some not very good looking 3D nail art. Never for extensions or overlay. Is it the same method?
For soft gels, my research - Christrio has a good range of colors but can be too watery to handle? BioSculpture has too many steps primer, bonder, etc. Never really found out about Calgel. Will definately check it out.
And you know.. I am totally addicted to shopping online for nail supplies too!!! You know of any reliable online stores for gel? I think most online stores do no ship cos its flammable?
Hi Angie :)
ReplyDeleteI have trouble with overfiling too! So now I try to sculpt the way I want the nail to look so I don't have to file too much.
Acrylic is what they use for 3D nail art you're right but they can be used for extentions too! If you're interested please go to YouTube and search for 'Chantellej18' she is GREAT with acrylics!
Christrio is very popular in Japan I think and so is Calgel. The primer and bonder, etc is only so there will be minimal lifting when you finish your nails. It's actually important for you to prep your nails well so the gel will adhere better to your nailbed.
As for shopping online there is a great store called Nail De Royale which carries Calgel, Christrio etc. You should check it out but I'm not sure how expensive the shipping will be though. I'm pretty sure that this site ships internationally :)
Thanks Joyce!
ReplyDeleteI did not know the same nail art acrylic can be used for extensions.. that's new for me!
I think I will buy a set of soft gel to try and keep you updated. Do you think soft and hard gels would work together?
Like soft for the base and hard for the color and top coat kind of combination?
Hey Angie
ReplyDeleteI started with Acrylics and then shifted over to gel for a little bit lol :)
I hope the soak off gels work out for you. They're supposed to be really great on anything and shouldn't do much damage to your natural nails. I'm not sure about the working soft and hard gels together idea. A lot of the times their companies only suggest using their products for whatever you're doing so I don't think they would suggest for you to mix in anything else. If I were you though I would definitely give it a try. If it doesn't work out you can just remove it and start over again. Practice makes perfect :p
thanks so much!! you provide such good advice
ReplyDeletewill keep you updated on my progress~
Angie!
ReplyDeleteGood luck.. I know you'll be great at it :D
Hi Joyce,
ReplyDeleteWould you know where I can buy BioSculpture?