Hi Guys!
Sorry I don't have any special nail posts today but I just wanted to let everyone know that the new Transformers movie was very exciting to watch! I had never been a fan of Transformers growing up but my boyfriend is a huge Autobots fan. He even wore his Transformers hoodie to the movie today. What a neeerd :) I think those who have already seen it will agree that it is very entertaining and I even cried during a scene. Gosh I am a total loser! I could NOT stop imitating the sound the Autobots and Decepticons make when they transform hahah (eeeeer kuk chik kuk kuk eeer weeeee chik kuk kuk). Anyways I can finally go ahead and cross that off my list of movies to see. Next up: BRUNO :D
NOTE* has anyone seen Year One? I looove Michael Cera (he's Canadian [woot] and I even saw him at Sydney Uni's Manning Bar once) but the movie trailer didn't look THAT great. Any reviews?
PS. Coming up tomorrow: picturse of my nail polish haul :)
xx
Joyce
Tuesday, June 30, 2009
Monday, June 29, 2009
14: 3D Nail art on fingers..
Hi Lovelies
I couldn't resist! We got back to my boyfriend's home quite early today so I decided to practice some more 3D stuff but this time on actual fingernails! I have the world's smallest fingernails so it was very tedious to do any 3D nail art on my fingers but luckily my boyfriend let me use his fingers (1 hand cause he was busy playing a computer game with his other hand) for practice!!! :)

Again I could only do one hand because he was busy with his stupid computer game but I have to admit he is super great for helping me out with this :D

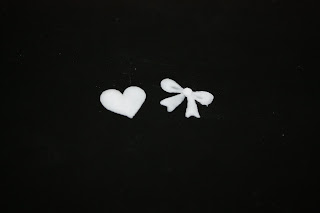
He had such huge fingernails I was so shocked! I made this bow super big to fit is creepy nails haha :)

I originally made a heart on his middle finger and left his index and ring fingers blank. He said that I should add an 'i' and a 'u' so he can flash me his fingers whenever I get mad at him.

This flower is actually quite small and it looks uneven to me. I give myself 3/5 for this one. Must practice more!
I feel like I only have 2 more days to fool around because from Thursday on I'll have a packed 3-4 days! I'm starting work on Thursday and I'm working from 5pm until 9pm at David Jones in Chatswood Chase (come say hi if you're in Chatswood!) then Friday I'm going to the Jay Chou (he's some famous Taiwanese singer) concert at Acer Arena then Saturday I have to wake up early for another job PLUS I have to help Kadi move his stuff into my house. I swear I think my mom loves my boyfriend more than me. She offered to take him in for as long as he wanted to stay lol but he's only going to stay until he finds another place to live.
We're watching the new Transformers movie tomorrow yay! Have you guys seen it yet? Would you recommend it?
xx
Joyce
PS.
This is absolutely not related to anything regarding nails but I wanted to properly introduce myself. I'm actually a 23 year old Asian girl (how many of you knew I was Chinese?) but anyways lol I'm Canadian but I've been living in Sydney with my mom for almost 3 years now. I grew up in Toronto, Ontario. I love to watch Grey's Anatomy (omg I was so shocked at the season finale! 007!), 30 Rock (Tina Fey is just brilliant) and Family Guy (Stewie is my absolute favourite evil baby). I'm going to be graduating this year with a BSci Psychology major degree and I attended both University of Toronto and University of Sydney. I've met such amazing a nice people here in Sydney and I also miss my friends super much in Toronto. I love to travel and shop for shoes (who doesn't?!), Hello Kitty, my family and friends and of course my baby dog (she's actually 5 years old this year) Meeka. I hope you guys will leave me some comments and tell me a little bit about yourselves too!

This is Kadi (pronounced KAH-dee but I screw it up all the time and call him KAI-dee) and I in Canberra the capital of Australia. My boyfriend has a bit of a belly in this picture but he's actually gotten chubby because of me. I don't know about you guys but I love food! I love to taste all kinds of food but maybe it's because of my bad eating habits I only like to try a little of each thing. Because of that poor Kadi here is forced to finish up the rest because I hate wasting food. I think he's put on around 5kg since we met back in December 2008 lol. Anyways that's not what this picture is about. You guys see that denim handbag I'm carrying? It's actually by Marc Jacobs and I got it for free! Kadi and I went to buy shoes at a store called The Corner Shop at The Strand and while I was trying on the shoes I the whole time I was just quietly chit chatting with one of the employees. We talked about the most randomest things like shoes (of course), going to Japan, taking sticker photos and other weird stuff. In the end when we were ready to pay for the shoes she brought out this bag and gave it to me as a gift because she said she really enjoyed our conversation! I think it was such a nice gesture and this just goes to show that a little smile and maybe even a greeting can cheer someone up even if they're having a crummy day. The world would be such a better place! I'm actually glad I started blogging because I really feel that the fellow bloggers I've met are so special and nice and it's also great that we all share the same passion for nails :)

Here's another one of us at Circular Quay in front of the Harbour Bridge just because we love being dumb and taking pictures of ourselves :p
Sunday, June 28, 2009
13: 3D Nail art continued..
Hi Girls & Boys :))
So I've been at it again! This 3D stuff sure is addicting. I played around with my powders and liquids for another solid 2 hours today (again at my boyfriend's place) and honestly I think I'm used to the nasty monomer smell now. I asked my teacher what she thought of the acrylic smell and she said that after 15 years of being a nail technician it now smells like CND's Solar Oil lol. I've taken some pictures to show you guys of the little items I made today. Hope you like them..

This is my take on a simple 5 petal flower. This time I was able to make the petals the right size (after many many times of trial and error)

This is another version of a bow. This one was easier to make and I actually think it looks cuter.

Flower #2. This one was quite interesting to make. I read a tutorial from the My Manicure blog (which is listed in My Bible) and in her post she taught her readers how to make this flower. Asami's version is beautiful. This was the best I could do. Must practice more!

CANDY with blue rhinestones! I'm a total fan of a girl named Mitsue because she is just amazing with anything acrylic related. Her blog is the Mini Nail Blog (which is also listed in My Bible) and I visit her very often. I got this inspiration from her because her last post was sweets related :D

Last but not least. This was by far my favourite out of the 5. I have a really pretty swarovski butterfly hair clip beside me and honestly I wanted to keep playing with the acrylics so I just decided to do this one on impulse. I was actually surprised cause I think it turned out pretty well!

I love playing around and experimenting with 3D nail art! My only problem is that I make them waaay to big to fit on anyone's fingers lol. Must practise more so I can make my own pretty nail art :) NOTE* I had a lot of trouble getting the rhinestones to stick on to the acrylic. I like to press them into the acrylic itself when the acrylic is still mould-able. But acrylic cures within 2 minutes so that's what you want to do then you have to get it in there fast! If not then the only option is to use nail glue to attach the rhinestones. Also you can choose to add a clear glossy top coat over your 3D nail art to make it shiny but I like the texture it is (a bit matte) without the top coat.
Anyways I'm off to watch some Family Guy now :p
Tomorrow (Monday) is my haircut and $5 date with Kadi day so I might not be able to post anything. But hang in there you guys cause I'll try to have some awesome pictures of nail polish swatches for you soon!
xx
Joyce
Saturday, June 27, 2009
12: 3D Nail art
Hello Lovely Readers :)
I'm finally updating! I feel like I've shamed all of you and didn't keep my promise to update often. I really wanted to but things have been so hectic lately. I've finally finished my exams so now all I have to do is wait for my results which should be out late July. I also got another job as mentioned before and this Thursday and Friday were my two training days. I learned a lot about the company and made some new friends (which is always nice). But now I'm ready to sit myself down and focus on you guys.. my fellow nail polish addicts :p.
Thursdays are usually my nail class days but since I had to attend orientation for my new job on this Thursday I only stayed for 2 hours at the nail boutique. I ran over there as fast as I could right after training. Boy were those 2 hours worth it! I have to say that I really really enjoy playing with 3D nail art. Although the acrylic liquid is super smelly the shaping and creating part of it all is just so fun it cancels out the badness lol. Just a heads up.. the pictures from my phone are super yucky and blurry. I took more pictures with my super camera the 2nd time I tried it at my boyfriend's place.. (remember to click on the pictures for a better view)

CND Limited Edition dappen dish, Sable sculpting brush, White Polymer (acrylic powder) - My two most perfect 3D flowers. I slaved for 2 hours and these were the only semi-presentable ones :p

This is my ibd Acrylic kit. I got this for my birthday this year and it was roughly around $250-$300? I'm not sure cause my girlfriends didn't tell me the exact price since it was a gift. I really love it but my heart still aches because I know they spent so much on me this year. I think if you were only interested in creating 3D nail art then maybe all you need would be 4 out of the 13 products in the kit. This kit is used for creating acrylic nails :)

White Polymer (acrylic powder) - Monomer (acrylic liquid) - ibd Professional 8 Oval sculpting brush. This is really all I used to create my 3D heart and bow. Also it's best to have a spare towel and some tissue paper handy incase of any messes or spills.

This was how I set up my little area. I couldn't have the whole table because my boyfriend was playing a childrens match-the-pictures game on the internet. *SIGH lol.

To get started I dipped my brush into the monomer and wiped off the excess. This is just a little habit I picked up while watching my teacher. Depending on the size of acrylic bead you want to use you would use more or less monomer on the brush each time. For example if you want to pick up a small bead you would only dip the tip of your brush into the monomer and tap lightly on the tissue paper to remove excess liquid. If you wanted a big bead you would dip your brush into the monomer but wouldn't wipe off any excess. The bigger the acrylic bead the more monomer you need in your brush.

Moving my tip soaked brush over to the Polymer (acrylic powder) and getting ready to pick up my first bead.

All you need to do is just lightly dip your brush into the polymer and gently scoop up the acrylic bead. When monomer and polymer come into contact with each other the liquid automatically turns the powder into a little ball. If you feel like the ball (bead) is either too big or too small don't worry and just get rid of it by wiping the bead and your brush on a piece of tissue paper. Practise makes perfect so I would suggest picking up different sized beads before you create any 3d nail art. What I prefer to do is always test out the texture of my bead after I place it on the tin foil. If it looks runny then I know that I used too much liquid so I would then wipe off any excess liquid on my brush and continue to sculpt the wet bead. If it looks powdery and dry then I would redip my brush into a little bit more of the liquid so it'll become a bit wetter and easier for me to sculpt. According to experts the perfect consistancy would allow the acrylic bead to look like an orange peel. Smooth but with a few bumps here and there.


This is my 2nd attempt at making a 3D heart. My first try was during nail class. I tried 2 methods of making this heart and I think this is the easier one. The first time I tried this I had picked up a really big acrylic bead and tried my best to just mold it into a heart shape. Today I tried it this way by picking up smaller beads and joining them together and by far I think this looks better than the one I made the other day. Try it yourself and let me know which way you prefer!


This is my frist attempt at making a 3D bow. It took my roughly 5 minutes cause I'm still practicing picking up consistant acrylic beads. Does it look like a real bow?
That's it for now girlies. Until my next post :))
PS.

I don't know about you guys but I think that this was the funniest thing I've seen all year! My boyfriend and I went to see the new Terminator movie a couple of weeks ago and after the movie was over we came out to the parking lot and noticed that this special car was parked beside us. I feel so bad for the poor thing cause it's missing a whole bumper! And what's funnier was that the owner of the car probably didn't know what to do with it so he/she just stuck the broken bumper into the back seat of the car lol. Very interesting! NOTE* if this here is your car I'm very sorry I laughed but it is very amusing :)

Also a couple of weeks ago my boyfriend and I went over to Darling Harbour at around 11:40pm after drinks with a few friends. We saw a super big and bright ferris wheel near the Chinese Gardens and decided to go for a little ride. I always loved Darling Harbour but seeing it from such a high point was so gorgeous. At night especially when all the lights are glistening. Very lovely and romantic :D
xx
Joyce
I'm finally updating! I feel like I've shamed all of you and didn't keep my promise to update often. I really wanted to but things have been so hectic lately. I've finally finished my exams so now all I have to do is wait for my results which should be out late July. I also got another job as mentioned before and this Thursday and Friday were my two training days. I learned a lot about the company and made some new friends (which is always nice). But now I'm ready to sit myself down and focus on you guys.. my fellow nail polish addicts :p.
Thursdays are usually my nail class days but since I had to attend orientation for my new job on this Thursday I only stayed for 2 hours at the nail boutique. I ran over there as fast as I could right after training. Boy were those 2 hours worth it! I have to say that I really really enjoy playing with 3D nail art. Although the acrylic liquid is super smelly the shaping and creating part of it all is just so fun it cancels out the badness lol. Just a heads up.. the pictures from my phone are super yucky and blurry. I took more pictures with my super camera the 2nd time I tried it at my boyfriend's place.. (remember to click on the pictures for a better view)
Thank you Kadi for being so great and taking these pictures for me! You gave up your kiddie game for 2 minutes and that really means a lot :p

CND Limited Edition dappen dish, Sable sculpting brush, White Polymer (acrylic powder) - My two most perfect 3D flowers. I slaved for 2 hours and these were the only semi-presentable ones :p

This is my ibd Acrylic kit. I got this for my birthday this year and it was roughly around $250-$300? I'm not sure cause my girlfriends didn't tell me the exact price since it was a gift. I really love it but my heart still aches because I know they spent so much on me this year. I think if you were only interested in creating 3D nail art then maybe all you need would be 4 out of the 13 products in the kit. This kit is used for creating acrylic nails :)

White Polymer (acrylic powder) - Monomer (acrylic liquid) - ibd Professional 8 Oval sculpting brush. This is really all I used to create my 3D heart and bow. Also it's best to have a spare towel and some tissue paper handy incase of any messes or spills.

This was how I set up my little area. I couldn't have the whole table because my boyfriend was playing a childrens match-the-pictures game on the internet. *SIGH lol.

To get started I dipped my brush into the monomer and wiped off the excess. This is just a little habit I picked up while watching my teacher. Depending on the size of acrylic bead you want to use you would use more or less monomer on the brush each time. For example if you want to pick up a small bead you would only dip the tip of your brush into the monomer and tap lightly on the tissue paper to remove excess liquid. If you wanted a big bead you would dip your brush into the monomer but wouldn't wipe off any excess. The bigger the acrylic bead the more monomer you need in your brush.

Moving my tip soaked brush over to the Polymer (acrylic powder) and getting ready to pick up my first bead.

All you need to do is just lightly dip your brush into the polymer and gently scoop up the acrylic bead. When monomer and polymer come into contact with each other the liquid automatically turns the powder into a little ball. If you feel like the ball (bead) is either too big or too small don't worry and just get rid of it by wiping the bead and your brush on a piece of tissue paper. Practise makes perfect so I would suggest picking up different sized beads before you create any 3d nail art. What I prefer to do is always test out the texture of my bead after I place it on the tin foil. If it looks runny then I know that I used too much liquid so I would then wipe off any excess liquid on my brush and continue to sculpt the wet bead. If it looks powdery and dry then I would redip my brush into a little bit more of the liquid so it'll become a bit wetter and easier for me to sculpt. According to experts the perfect consistancy would allow the acrylic bead to look like an orange peel. Smooth but with a few bumps here and there.


This is my 2nd attempt at making a 3D heart. My first try was during nail class. I tried 2 methods of making this heart and I think this is the easier one. The first time I tried this I had picked up a really big acrylic bead and tried my best to just mold it into a heart shape. Today I tried it this way by picking up smaller beads and joining them together and by far I think this looks better than the one I made the other day. Try it yourself and let me know which way you prefer!


This is my frist attempt at making a 3D bow. It took my roughly 5 minutes cause I'm still practicing picking up consistant acrylic beads. Does it look like a real bow?
That's it for now girlies. Until my next post :))
PS.

I don't know about you guys but I think that this was the funniest thing I've seen all year! My boyfriend and I went to see the new Terminator movie a couple of weeks ago and after the movie was over we came out to the parking lot and noticed that this special car was parked beside us. I feel so bad for the poor thing cause it's missing a whole bumper! And what's funnier was that the owner of the car probably didn't know what to do with it so he/she just stuck the broken bumper into the back seat of the car lol. Very interesting! NOTE* if this here is your car I'm very sorry I laughed but it is very amusing :)

Also a couple of weeks ago my boyfriend and I went over to Darling Harbour at around 11:40pm after drinks with a few friends. We saw a super big and bright ferris wheel near the Chinese Gardens and decided to go for a little ride. I always loved Darling Harbour but seeing it from such a high point was so gorgeous. At night especially when all the lights are glistening. Very lovely and romantic :D

xx
Joyce
Monday, June 22, 2009
11: NOTD
Hi Everyone!
I just wanted to share my nail of the day with you all and hopefully this super simple design will inspire some really great nail art :)
So I got another job working for a big company as a sales assistant here in Chatswood (the suburb I live in) and they require you to wear all black as a standard uniform. All black and no colour really bums me out so I decided to make my nails look a bit nicer to make myself happier. Now I actually don't know if this is allowed at work so I'll have to ask at my orientation on Wednesday. Hope you guys like it..

Taken with flash - Taken without flash. This was really easy to do! I put a layer of base coat (I'm using OPI's Nail Envy because I'm trying to make them grow stronger and faster) and then attach 2 heart flakies and a crystal rhinestone in the middle. After that I just sealed it together wtih my Seche Vite. When I use rhinestones I usually like to use a generous amount of top coat so it's fully protected.
Also..
I acually wasn't going to post this because I wanted to surprise the girls but I couldn't help it! After my exam today I went to a Japanese $2.50 store and bought a whole bunch of stuff which included 5 Charmmy Kitty paper bags. These bags are soo cute so I decided to use them to pack the nail polishes from the Giveaway. Millie, Mia, Missy, and Hannah you should be recieving yours in the mail soon.. hopefully :D

Hope you really enjoy them!
Anyways guys my last exam is tomorrow afternoon so I'm gonna take this time now to cram all that I can into my under-average sized brain. Hope I pass!
xx
Joyce
Sunday, June 21, 2009
10
Hi Good Lookin' :)
I wanted to hold out until after Tuesday (when I finish exams) to send you all a decent post (one that you guys totally deserve) but I feel so bad for abandoning my little blog and I miss talking to you girls so much! So I've stopped by for a mini post! It's nothing much but I did my nails at work today. You guys might be wondering where I work since I get to play with my nail polishes but it's really nothing related. I work in an office on the weekends all by myself and our filing cabinet was locked which meant that I couldn't do any filing so I decided to paint the digits (nails). Now similar to the rest of you I'm sure that there's a special brand of nail polish that you looove and always trust. For me those polishes are OPIs and China Glazes. But I was travelling with a group of my friends back in February and we went to Gold Coast which was about a 1.5 hour flight from Sydney. One night we got bored and went around Surfer's Paradise just browsing and buying some random knick knacks. I needed to remove my old manicure because the water from the ocean and the chlorine from the pool had killed most of the design and it was starting to look ugly lol. Anyways I found the Chemist (the chemist is like a pharmacy for those not from Australia) and noticed that they had out huge boxes of nail polish called Ulta3. The thing is these polishes were only $2AUD each! Considering a bottle of OPI sells for $20AUD at David Jones I quickly dug my way into the piles of nail polish. I managed to find colours that I absolutely LOVE. One of them was a gray chrome and it just somehow managed to look good on ANYONE's nails (no matter the colour of your skintone.. all of my friends tried it the night I bought it). And the other one was this..

Taken without flash - Taken with flash
This colour is called Candied Violet and it may not come out as that on the pictures but in real life this is similar to Dorothy's red ruby shoes.. if those shoes were a light purple with a subtle hint of pink. The reason why I compared them this was is because of the mircoglitter sparkle. They shine from a block away and I just love it. When it is fully dry it feels like a matte nail polish but a generous coat of seche vite will smooth it all out. I'll take a picture of the bottle for you guys when there's some sun to see if I can correctly capture it's true colour.
I know this isn't much bit I still hope you guys enjoyed :) If you have time please let me know what polish brand is your trusty go to brand and your all time FAVOURITE colour (you can only pick one). Talk to you soon!
xx
Joyce
Tuesday, June 16, 2009
9
Hello Lovlies
I'm so so so sorry for the lack of updates but as many of you know I did my own gel nails last thursday and as expected they lifted! I'm still mourning the condition of my nails. So I've gone ahead and removed them but now my nails are extremely sensitive and they're super short like stubs lol. So again I wanted to apologize and also to let everyone know that my next update will most likely be this Thursday because I have my 3D Nail Art class that day. I'll be sure to update you guys on my newbie 3D Nail Art quest! Also my internet seems to be a bit weird lately. I can't get my wireless to work properly so I've actually been stealing my cousin's laptop. He has Windows XP installed and that works fine. Maybe it's another one of Vista's buggies.
Update: To the ladies who have requested something from the giveaway I will be mailing the items out on Thursday not Wednesday sorry. I'm going to be studying on Wednesday. Also I have sent emails requesting your mailing address. If you can kindly reply me back I will have those items shipped to you as soon as possible :)
I'm also expecting to visit my friendly nail supply store sometime after my exams which is next Tuesday so when July is approaching there will 10000% be a huuuge post of my nail polish collections as well as a photospam of all the colours! I can't wait for exams to end :)))
Talk to you guys soon!
xx
Joyce
Friday, June 12, 2009
8: Gel nails
Hi Guys!
I wanted to take pictures of the salon I study at but I thought it would've been weird if I started taking pictures of everything with my huge camera so instead I took few pictures with my cellphone of my gel nails lesson. Now I wanted to take pictures of the step-by-step process but since I had to do the nails myself it was a bit hard so I only took a few pictures of the products we used and the curing process. Sorry guys maybe I'll have a chance to do it again next time! So yesterday was the first time I ever did a UV Gel Overlay on my natural fingernails. The process is quite hard for someone who's never had any experience and I think it definitely takes practice to perfect the treatment. There were so many times where I messed up and overfiled my gels. Anyways on to some of the pictores :)

This is my working area. It's super girly and antique-y and lace-y and pink :) There's approximately 8 separate working areas in the whole salon and most of the times they're all filled with other students or clients.

This is our nail polish station. Near the bottom you can see the CND nail polishes neatly arranged by colour on an antique table with a pink flower bucket centerpiece. So pretty :)

This is CND's UV Light (machine?). This is what you use to lock and cure your gel nails. It was quite fun to play with.

Onto the gels. Since my teacher is CND's education embassador it's only natural that we used CND's Brisa gel for the experiment. The whole process was quite simple actually.
1. Use a file to remove the shine. 180 grit file preferred.
2. After the shine has been removed from your natural nails wipe nails with Scrub fresh to prep.
3. After using Scrub Fresh carefully apply a thin layer of gel (similar to a base coat) to your natural nails all the while making sure the gel does not touch your skin (if the gel touches your skin it will most likely cause lifting)

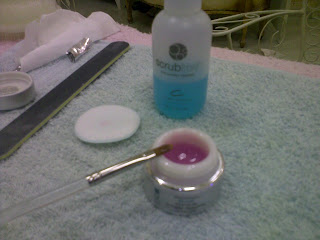
In this picture you can see Scrub Fresh - Gel brush - Gel.
4. After you have applied your 1st gel coat cure in the UV Light for 2 minutes.
5. After you have finished curing wipe nails with Scrub Fresh to remove the sticky layer.
6. After you have removed the sticky layer put on a 2nd coat of the coloured gel.
NOTE* Now I think that this is the tricky part to explain. When you put on the 2nd coat it should be thick and you don't really paint it on. I was taught to pick up the gel with the brush and just push and move the gel around your nail for full coverage. It was definitely hard for me to do so I ended up using my painting method again but basically with more gel so the colour is visible. This just one of the things that takes a lot of practice to get it right.
7. After you finished applying the 2nd coat put your fingers in the UV Light for the locking step. Locking takes only 10 seconds.
NOTE* About a year ago I had gel nails put on and instead of just lightly buffing away the natural shine my nail tech used a drill buffer which is much faster I suppose. At the same time after I had my gel nails removed I noticed that my nails were a bit weaker than before. This was proved yesterday when I put my fingers in for the locking process. The first time you cure the base coat there should be absolutely no feeling at all for your nails. But when it comes to locking I had noticed a sharp intense pain which felt like my nails were burning! It was so hot I had to pull my hands out. When my teacher noticed this she asked me if I had artificial nails before and I told her about my previous gel experience. She concluded that my natural nails aren't as strong as they used to be and had also become thinner than before so that's why the pain was so intense for me. She also noted that it could also be because she had just replaced the UV Light with a new bulb but most likely it was my thin thin nails. She also told me that if I couldn't stand the Locking pain anymore then I can just skip that process and cure for 2 minutes instead.
8. After all that fancy locking and curing remember to remove the sticky layer with Scrub Fresh and prepare to file. Filing was very difficult for me as I couldn't control it properly. I overfiled too much and had to put the gel on again and repeat the whole process. It definitely takes a while to get used to.
9. Once you are satisfied with the shape of the nail seal everything in with Brisa Gloss the gel top coat but remember to also be careful when applying the top coat because if this touches the skin then it can cause lifting too!
10. After applying the topcoat cure again for 2 minutes.
11. After you have finished curing in the UV Light remove the sticky layer with Scrub Fresh and voila you are FINALLY finished :)
12. Remember to apply cuticle oil because it's most likely that your cuticles would've taken a beating with all that filing.


Being the super newb that I am this actually took me a full 6 hours to do hahha! Well with the exception of a 40minute lunch break :p
I hope this was kinda helpful for anyone who's about to do their own gel nails for the first time or anyone who's about to get gel nails. It will take you some time to get used to the feeling so give it a few days. As for any advice to anyone who's about to do their own nails for the first time I strongly recommend that you have someone there who can guide you because it's really not easy to do but if you're super awesome and can follow instructions perfectly and do everything without fail then by all means good luck with your project :D
PS. The colour of my gels was a clear Cool Pink.
xx
Joyce
Wednesday, June 10, 2009
7
Hi Girls!
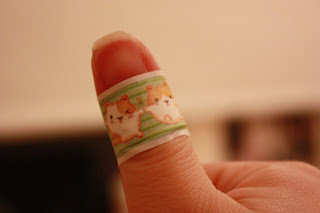
I really wanted to post something new and fun today but my thumb wound still isn't fully healed yet so I figured that since I have nail class tomorrow morning I will take some pictures and show you my class :)
As for now I'm stuck at an internet cafe called City Hunter here in Burwood which is about 30 minutes from Chatswood (where I live). I've been here for the past 3 hours and honestly I'm about to blow my brains out! This place is FILLED with boys playing computer games :(
Supposedly there's this game called World of Warcraft and all the boys are hooked on this game. They log online and play 'DOTA'? which is like some universal online war thing (i have absolutely no idea about). I'm trying hard to understand the game but my boyfriend won't even take time off the screen to teach me lol. It's actually quite funny because from time to time random people scream out the dumbest things to their computer screens. So to sum it up I'm here singing songs to myself while he's sitting beside me killing his enemies. Fun Fun Fun :)
But I promise that I will have a fun and interesting post for you guys tomorrow. See you then!
PS. If any of you girls play this game would you please explain it in SUPER SIMPLE form to me so I can understand too?
PPS. To all the girls who have requested an item from the giveaway I will send items out next Wednesday so be on the lookout for an email from me soon :D
xx
Joyce
Tuesday, June 9, 2009
6: Giveaway
Hello Ladies! (and Gentlemen if there are any..)
I'm sorry I didn't get to post anything nail related today but 2 of my nails broke while I was cleaning my room and just now I managed to somehow cut my thumb with a Konad scraper (how bizzare is that?! but be careful because those things are actually quite sharp!)
Anyways I wanted to thank all you guys for coming here to read my posts and for leaving such funny and sweet comments :) Also I noticed there are followers now! I wanted to follow your blogs too but I'm totally dumb with this blogger thing so instead I have added your blog to 'My Bible' which is in the sidebar.. Hope that's okay!
So today I really wanted to make a step-by-step post on how I do my manicures. Everything from shaping - buffing - shining - painting but since I just cut my thumb I didn't think it was a good idea to get any nail polish remover near the cut because it might sting so instead I cleaned out my little nail stash drawer and I found a new polishes and other little knick knacks I thought you guys might like.
It's a giveaway. Now please keep in mind that everything I'm about to list has been used before but I have sanitized most of them including the Konads. Nail polish on the other hand is a bit harder to santize so I just left those alone for now. Everything I'm listing is less than 3 months old and the reason I'm giving them away is because I feel that someone else might use them more than I will. Also because I wanted to say thanks for all the new friends I've made!
Because of exams I haven't had time to go shopping for new nail toys but once I do I'll be sure to pick up some better things for you guys! Now if you're not picky and don't mind some 2nd hand products I'll show you what I have to give :)
#1 Konad Scraper and Stamper - Reserved for May


As you can see I've grouped the items into 2s and they're listed from #1 to #7. If you'd like me to send any of the above items please leave a comment with your..
Full name
Email Address
The number of your preferred gift
Since I only have 7 items available to choose from they will be given away by first come first serve. I will read all of my comments and once someone chooses their item I will update this post by crossing out the number and listing the person's name so you all know it's taken.
I know it's nothing special but still I'm sure you can have some fun with my preloved nail polish and accessories. I'll leave it here for now and I'll talk to you fine ladies soon!
PS. What do you guys think of my cellphone? Too much? I went a bit crazy with all the Swarovski rhinestones but look how shiny :)

I'm sorry I didn't get to post anything nail related today but 2 of my nails broke while I was cleaning my room and just now I managed to somehow cut my thumb with a Konad scraper (how bizzare is that?! but be careful because those things are actually quite sharp!)

Anyways I wanted to thank all you guys for coming here to read my posts and for leaving such funny and sweet comments :) Also I noticed there are followers now! I wanted to follow your blogs too but I'm totally dumb with this blogger thing so instead I have added your blog to 'My Bible' which is in the sidebar.. Hope that's okay!
So today I really wanted to make a step-by-step post on how I do my manicures. Everything from shaping - buffing - shining - painting but since I just cut my thumb I didn't think it was a good idea to get any nail polish remover near the cut because it might sting so instead I cleaned out my little nail stash drawer and I found a new polishes and other little knick knacks I thought you guys might like.
It's a giveaway. Now please keep in mind that everything I'm about to list has been used before but I have sanitized most of them including the Konads. Nail polish on the other hand is a bit harder to santize so I just left those alone for now. Everything I'm listing is less than 3 months old and the reason I'm giving them away is because I feel that someone else might use them more than I will. Also because I wanted to say thanks for all the new friends I've made!
Because of exams I haven't had time to go shopping for new nail toys but once I do I'll be sure to pick up some better things for you guys! Now if you're not picky and don't mind some 2nd hand products I'll show you what I have to give :)
#1 Konad Scraper and Stamper - Reserved for May

#2 Konad Scraper and Stamper - Reserved for Dustbunny

#3 Revlon Nail Polish - Reserved for Missy Pratt


#4 Konad Special Nail Polish (mini size) - Reserved for Mia Santoso


#5 - Nail Art Pen - Reserved for Millie!

#6 Ulta Glitter Nail Polish - Reserved for Hannah Sim

#7 Missha Nail Polish - Reserved for Hannah Sim.

As you can see I've grouped the items into 2s and they're listed from #1 to #7. If you'd like me to send any of the above items please leave a comment with your..
Full name
Email Address
The number of your preferred gift
Since I only have 7 items available to choose from they will be given away by first come first serve. I will read all of my comments and once someone chooses their item I will update this post by crossing out the number and listing the person's name so you all know it's taken.
I know it's nothing special but still I'm sure you can have some fun with my preloved nail polish and accessories. I'll leave it here for now and I'll talk to you fine ladies soon!
PS. What do you guys think of my cellphone? Too much? I went a bit crazy with all the Swarovski rhinestones but look how shiny :)

xx
Joyce
Monday, June 8, 2009
5: Test nail
Hi Everyone!
Today was a public holiday so I just stayed home with the family. My boyfriend and I were going to go to the shopping mall for a little while but it was kinda cold and we just couldn't be bothered (also he had just finished his night audit shift so he was dead tired) He's going to work again soon so now he's taking a quick power nap. I got bored doing nothing and I really didn't feel like cleaning my room so I decided to try my own version of a nail design. I'm sad to say this but the results came out abysmal :( I think I used the wrong sized rhinestones. I didn't actually want to use a lot because I wasn't making this my official manicure so I didn't want to waste a lot of jewels. Anyways here's my take. What do you guys think? Should've used bigger and more rhinestones?

Base coat - 3 coats of OPI's Light My Sapphire - Rhinestones in crystal squares and circles - Top coat. Please excuse the other unpainted nails in the picture I just wanted to try out this design on one of my nails first.

Believe it or not but THIS was my inspiration! These nails look so lavish and chic but mine unfortunately are nothing compared to this. Oh well I'll just try it again next time :) Practice makes perfect!
PS. I wanted to say hi to Kaybee from http://lookatthispolish.blogspot.com. Kaybee was my first comment and I think that makes her pretty special :D
PPS. I also want to send a big virtual hug out to Brooke from http://getchanailsdid.blogspot.com. She kindly featured my newbie blog on her super awesome nail blog. Thanks again Brooke :))
Joyce
Today was a public holiday so I just stayed home with the family. My boyfriend and I were going to go to the shopping mall for a little while but it was kinda cold and we just couldn't be bothered (also he had just finished his night audit shift so he was dead tired) He's going to work again soon so now he's taking a quick power nap. I got bored doing nothing and I really didn't feel like cleaning my room so I decided to try my own version of a nail design. I'm sad to say this but the results came out abysmal :( I think I used the wrong sized rhinestones. I didn't actually want to use a lot because I wasn't making this my official manicure so I didn't want to waste a lot of jewels. Anyways here's my take. What do you guys think? Should've used bigger and more rhinestones?

Base coat - 3 coats of OPI's Light My Sapphire - Rhinestones in crystal squares and circles - Top coat. Please excuse the other unpainted nails in the picture I just wanted to try out this design on one of my nails first.

Believe it or not but THIS was my inspiration! These nails look so lavish and chic but mine unfortunately are nothing compared to this. Oh well I'll just try it again next time :) Practice makes perfect!
PS. I wanted to say hi to Kaybee from http://lookatthispolish.blogspot.com. Kaybee was my first comment and I think that makes her pretty special :D
PPS. I also want to send a big virtual hug out to Brooke from http://getchanailsdid.blogspot.com. She kindly featured my newbie blog on her super awesome nail blog. Thanks again Brooke :))
PPPS. Lastly I want to say a quick HI! to the great people who have been coming here to follow my blog, read my posts, and leave comments for me to read. I will read all the comments and reply back I promise! Aww so much love :))) (<-- a happy face with triple the chins means I am totally ecstatic)
xxJoyce
4
Hi again!
Sorry for all these random posts but I'm soooo awake right now but it's already 1:30am. Blaaarg! I made the mistake of taking a power nap today during dinner time and now i can't fall asleep :( I decided to look through my old pictures to see if there was a special nails related photo album I could put together and I found old pictures of when my nails were super short and also my 'I LOVE GEL NAILS' phase :)

Back when I was still a first year uni student I didn't take care of my hands at all. I had really dry and cracked hands and fingers. Especially in Toronto when the winters were super cold but now I always have my Herbacin Chamomile & Glycerin Hand Cream (my mom was nice enough to haul some back for me from Canada.. I don't think they have this here in Australia) and Burt's Bees Lemon Butter Cuticle balm (which my cousin gave to me from one of her Priceline gift samples) Also check out my nails. Look at how short they are. I find that with short nails it's easier to pull off more dramatic colours. Very fashionable :)

I work for the Management office of a shopping centre so a lot of the times if a new tenant has a grand opening we are usually invited to the party functions. During that time a new bar was opening up in the shopping centre so my manager and I were both invited. I went to my favourite nail tech (Emma from Miss Divine) and she said I could try gel nails if I wanted to achieve more length. I had a set done and from then on I was hooked! I couldn't wait to get infills and prayed every night that my nails would grow faster just so I could go back to Emma and have her design a new set for me. I loved the gels but it did take me a couple of days to get used to them. In this picture Emma made the gel nails and applied a shimmery purple glitter french tip. I added the rhinestones a week later just for a bit of change.

In this picture Emma made gel nails with a classic white french tip. She used clear gel and the french tip look was actually airbrushed on with white paint. The nails were a bit too long for me so I asked her to file them down a bit. A week later I applied a coat of shimmer polish and added pearls for a different look (also to hide my much needed infill area). NOTE* If you do have acrylic or gel nails and you start to notice the growth but can't be bothered going in for infills you can try to change the design like I did and use pearls or rhinestones to cover up the area until you have time to see your nail tech.
My Nail Art Hobby course actually has a gel nails lesson and I should be starting that in a few weeks time. I'll be sure to take many pictures and show everyone what the process is along with all the other special stuff.
PS. The dark green in the short nail picture is China Glaze's Gussied Up Green. My friend Teresa says it looks like mussels. What a weird girl :p
Good morning/afternoon/night everyone..
xx
Joyce
Subscribe to:
Posts (Atom)


