I'm finally updating! I feel like I've shamed all of you and didn't keep my promise to update often. I really wanted to but things have been so hectic lately. I've finally finished my exams so now all I have to do is wait for my results which should be out late July. I also got another job as mentioned before and this Thursday and Friday were my two training days. I learned a lot about the company and made some new friends (which is always nice). But now I'm ready to sit myself down and focus on you guys.. my fellow nail polish addicts :p.
Thursdays are usually my nail class days but since I had to attend orientation for my new job on this Thursday I only stayed for 2 hours at the nail boutique. I ran over there as fast as I could right after training. Boy were those 2 hours worth it! I have to say that I really really enjoy playing with 3D nail art. Although the acrylic liquid is super smelly the shaping and creating part of it all is just so fun it cancels out the badness lol. Just a heads up.. the pictures from my phone are super yucky and blurry. I took more pictures with my super camera the 2nd time I tried it at my boyfriend's place.. (remember to click on the pictures for a better view)
Thank you Kadi for being so great and taking these pictures for me! You gave up your kiddie game for 2 minutes and that really means a lot :p

CND Limited Edition dappen dish, Sable sculpting brush, White Polymer (acrylic powder) - My two most perfect 3D flowers. I slaved for 2 hours and these were the only semi-presentable ones :p

This is my ibd Acrylic kit. I got this for my birthday this year and it was roughly around $250-$300? I'm not sure cause my girlfriends didn't tell me the exact price since it was a gift. I really love it but my heart still aches because I know they spent so much on me this year. I think if you were only interested in creating 3D nail art then maybe all you need would be 4 out of the 13 products in the kit. This kit is used for creating acrylic nails :)

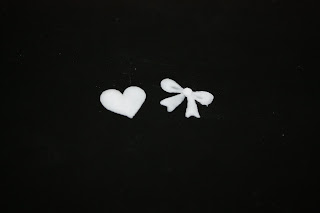
White Polymer (acrylic powder) - Monomer (acrylic liquid) - ibd Professional 8 Oval sculpting brush. This is really all I used to create my 3D heart and bow. Also it's best to have a spare towel and some tissue paper handy incase of any messes or spills.

This was how I set up my little area. I couldn't have the whole table because my boyfriend was playing a childrens match-the-pictures game on the internet. *SIGH lol.

To get started I dipped my brush into the monomer and wiped off the excess. This is just a little habit I picked up while watching my teacher. Depending on the size of acrylic bead you want to use you would use more or less monomer on the brush each time. For example if you want to pick up a small bead you would only dip the tip of your brush into the monomer and tap lightly on the tissue paper to remove excess liquid. If you wanted a big bead you would dip your brush into the monomer but wouldn't wipe off any excess. The bigger the acrylic bead the more monomer you need in your brush.

Moving my tip soaked brush over to the Polymer (acrylic powder) and getting ready to pick up my first bead.

All you need to do is just lightly dip your brush into the polymer and gently scoop up the acrylic bead. When monomer and polymer come into contact with each other the liquid automatically turns the powder into a little ball. If you feel like the ball (bead) is either too big or too small don't worry and just get rid of it by wiping the bead and your brush on a piece of tissue paper. Practise makes perfect so I would suggest picking up different sized beads before you create any 3d nail art. What I prefer to do is always test out the texture of my bead after I place it on the tin foil. If it looks runny then I know that I used too much liquid so I would then wipe off any excess liquid on my brush and continue to sculpt the wet bead. If it looks powdery and dry then I would redip my brush into a little bit more of the liquid so it'll become a bit wetter and easier for me to sculpt. According to experts the perfect consistancy would allow the acrylic bead to look like an orange peel. Smooth but with a few bumps here and there.


This is my 2nd attempt at making a 3D heart. My first try was during nail class. I tried 2 methods of making this heart and I think this is the easier one. The first time I tried this I had picked up a really big acrylic bead and tried my best to just mold it into a heart shape. Today I tried it this way by picking up smaller beads and joining them together and by far I think this looks better than the one I made the other day. Try it yourself and let me know which way you prefer!


This is my frist attempt at making a 3D bow. It took my roughly 5 minutes cause I'm still practicing picking up consistant acrylic beads. Does it look like a real bow?
That's it for now girlies. Until my next post :))
PS.

I don't know about you guys but I think that this was the funniest thing I've seen all year! My boyfriend and I went to see the new Terminator movie a couple of weeks ago and after the movie was over we came out to the parking lot and noticed that this special car was parked beside us. I feel so bad for the poor thing cause it's missing a whole bumper! And what's funnier was that the owner of the car probably didn't know what to do with it so he/she just stuck the broken bumper into the back seat of the car lol. Very interesting! NOTE* if this here is your car I'm very sorry I laughed but it is very amusing :)

Also a couple of weeks ago my boyfriend and I went over to Darling Harbour at around 11:40pm after drinks with a few friends. We saw a super big and bright ferris wheel near the Chinese Gardens and decided to go for a little ride. I always loved Darling Harbour but seeing it from such a high point was so gorgeous. At night especially when all the lights are glistening. Very lovely and romantic :D

xx
Joyce


What a great tutorial, your heart and bow look perfect!
ReplyDeleteThe poor owner of that car lol =x
Hi Joyce,so happy to see an new post,your nail art looks amazing...LOL at that car,thats so funny.I love darling harbour its g0rjuz. Cant wait for more posts.Good luck with your results from your exams.You will have to let us know how u went.Take care hun.Mwahzzz
ReplyDeleteHi Joyce, that's a nice acrylic work :) I'm doing some acrylic nail art, too. But it wasn't as good as yours, your heart and bow look great :)
ReplyDeleteHi Kae :)
ReplyDeleteAww thanks honestly I quite like that bow myself lol. Have you tried using acrylic for 3D nail art? I'm sure it'll look great on your long nails!
Hiii Skye!
ReplyDeleteI know I absolutely love Darling Harbour too! That's the place I went with my boyfriend. We got ice cream from Anderson's on our first date haha. BTW I'm heading down to Bankstown tomorrow for some new polishes and stuff. Did you want me to pick up anything for you? :D
Hi Mia!
ReplyDeleteThanks and I'm patiently waiting for your rainbow nails tutorial I'm SO excited. I checked out your post and your 3D art looks great too! Keep up the good work xx
Thanks for keeping us updated on everything your doing. I've seen some amazing things done with acrylics. Especially the Asian artisans. For being new at this you've done an beautiful heart and bow.
ReplyDeleteHi Lucy
ReplyDeleteThank you for your super duper sweet comment :)
This was my 2nd try at it and honestly I was not creative yesterday at all and these were the only 2 things I could think of at the moment lol. I made some new ones today. I'll post it soon!
ps.. I have a question. when I do 3d art, I'm afraid that the monomer will leech a way the polish. Is a gel coat necessary before putting 3D on the nail?
ReplyDeleteHello!
ReplyDeleteI actually find it quite alright to add 3D nail art onto your existing nail polish. I think a gel coat would be good if you are adding the nail art onto artificial nails (acrylic nails or gel nails) but for natural nails I don't think it's necessary. If you're really afraid of it affecting the polish you can always put on your top coat and then add the 3D nail art :D